The PlanMinder Manual - 03 Report Time
This is one chapter from the manual. Access the full manual here.
Report Time
▶ Video reference Developer @ 0:29The Report Time page is where you inform The PlanMinder what you actually has been working on, and also where you can report the completion of activities, or update time estimates. The page has two tabs, Report Time, and Update Activity Status.
Report Time
On this tab you report how much you have worked on an activity. This is used by The PlanMinder to calculate how much work remains, so that a new more accurate schedule can be generated. This way the schedule can be kept up to date all the time. Your entries are also stored so that you can later go back to see how much work the activity actually took, and what was actually done. This will help you make better time estimates the next time you are to do something similar.
Time reports must be committed to be visible to others and to be used in calculations by The PlanMinder.

Page overview
The central area of the page is the week overview. Here you have a matrix of days and activities, with sums. You can enter time directly in the matrix.
Below the week overview is the list of all work report entries. You can move the divider to adjust how much space is used for the overview and the list.
Above overview is an activity information area. It shows information about the selected activity.
On the left is the project tree view. Here you can find all activities in all projects.
How to report time
There are many ways to create a new time report entry. Find a way that fits your personal preferences.
The week overview lists activities you are scheduled to work on, activities you have marked as favorites and activities you already have reported time on this week. If the activity you are looking for is there, you can simply type the number of hours in the corresponding field in the matrix. This will also create a new entry in the list below, where you can access more details.
If the activity is not in your overview, you need to add it. This can be done in several ways.
From the project tree view you can
- Double click on an activity
- Drag and drop an activity
- Select and activity in the tree view and then clicking the add from tree button
All these methods will create a new entry for the marked day in the overview and in the report list. Click on a day above the week overview to change which day is marked.
 The top row in the overview is and empty row with a plus symbol. You can start typing the name in the “select an activity” field to start a search for an activity you know the name of.
Using the timer function
 All rows in the week overview for the current week, and all entries in the list for today's date has a timer symbol. Click on the timer to measure time as you work. Time will be added to the corresponding report entry, or a new will be created if it does not exist. Click again to stop the timer, or on another activity timer to switch task.
Time report comments
Adding a short comment to each time report provides a lot of value. For one, without a comment it is very difficult to correct a report with errors. When reviewing project history, comments will help you understand what did take time, what did not, and why.
 In the week overview matrix there is a little text icon next to every time entry. You can click on it and enter a comment. If the entry has a comment, the icon gets a green check mark.
In the report entry list, comments has their own column.
Committing time report entries
You need to commit your time reports to signal that they are complete. They will not be visible to others, nor be used by The PlanMinder scheduler, until they are.
 To the right of each row there is a button to commit entries corresponding to the row. There is also a commit all button in the week overview.
Only reports with a non zero time, and a selected activity can be committed. A dialog box will tell you how many reports will be committed, and if any of them are missing a comment. You can commit entries without a comment, but you really should write comments.
Committing entries does not prevent you from continue to edit them. Committed entries get a green check mark in place of the button. Uncommittable entries gets a red minus symbol.
Time entry tricks
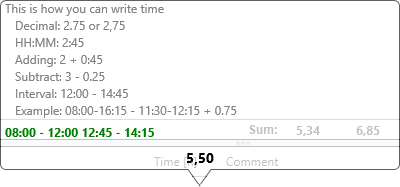
Time is displayed in decimal hours, but when you enter time you can do it either as decimal hours or hours:minutes. You can also do addition and subtractions, and use time ranges, like 13:00 – 14:15. If you do a help display will pop up, showing you what syntax you can use, if your syntax is correct and what the result will be.
Week overview
The week overview will by default show the current week. You can change weeks one step at a time with the green arrows, or select a week with the date selector. The double right arrows will take you back to the current week.
The week days are color coded with information from the work schedule. Current day is marked by a circle, and active day is marked as a tab. Active day is the day new entries are created for.
 Yellow stars marks favorites. Click on a star to toggle favorite status. Favorite activities will be listed in the week overview for new weeks, even if they are not scheduled.
 The X button on each row lets you delete all entries corresponding to this row.
Time report list
The time report list shows every entry as a list element, sorted and color coded by day. It is linked to the week overview, so any change is reflected in both places.
To the right of the comment is a field for type of work. It has a default value based on the value set for the activity, but sometimes you need to change it to match what you have done. This value is used to track what type of work the team is doing across all projects. What work types you can select is up to your organization to define.
 The first button on the right side lets you copy a time report. A new report entry with the same activity, comment and work type is created for the active day. The time will not be copied.
The X button deletes the entry.
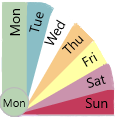
Clicking on the day circle for an entry lets you move the entry to a new day.
Anonymous entries
 Sometimes you do work without knowing what activity it should be reported on. You can create a report for work without selecting an activity. You can click the (+) button in the week overview, enter a time on the first row in the week overview, or start the timer for the first row,
You can not commit the report until you have selected an activity for the report. You can do this by starting to type in the activity field to search for a named activity, or you can find the activity in the project tree view and drag and drop it on the report, either in the week overview or the report list.
The Billable flag
If enabled in settings, you will see a money symbol on the time report rows in the list. This is used to signal if the reported time is billable or not. Your organization will have to decide if you are going to use this feature or not.
 The flag will get its default value from the setting in the activity. You toggle it by clicking on it.
To export this information go to the reports page.
The activity information area
The activity information area displays information about the selected activity. You can select an activity in the tree view, or click on a time report row.
You can see the name, the project and who is responsible for the activity. For scheduled activities you can also see a visual representation of how much work has been done, and how much work is estimated to be left. The uncertainty is visualized with a box and whiskers plot.

The green bar represents work done, and the orange represents the expected remaining time. The box represents the 1:st and 3:rd quartile. There is a 50 % chance that the end result will be inside the box. The whiskers represent 10 and 90 % probability. All according to your estimate and the model The PlanMinder uses.
If you move the mouse pointer to the plot it will display a legend, the estimates as numbers, and when the time estimate was made. The light green part of the bar represents work reported after the last estimate was made.
 If you are authorized to, you can click the edit button to bring up the activity dialog, and edit the activity, change status or update the estimate of remaining time.
 The other button will open the corresponding project in the Kairos view, so that you can see how the activity fits in with other activities in the project.
Description overlay
You can right click on elements in the tree view, or on activity names in the week overview or time report list to bring up the description overlay.
For activities the description overlay displays the full description and information about estimated remaining time. Use the Update-button to change status or update estimate of remaining work.
Update Activity Status
You can update the status and estimate of an activity from edit dialogs and description overlay on many pages. The Update Activity Status tab however is specialized to give you an overview of all active activities you are assigned to.
Activities are shown as cards on the right side, ordered by how likely they are to need an updated estimate or changed status.
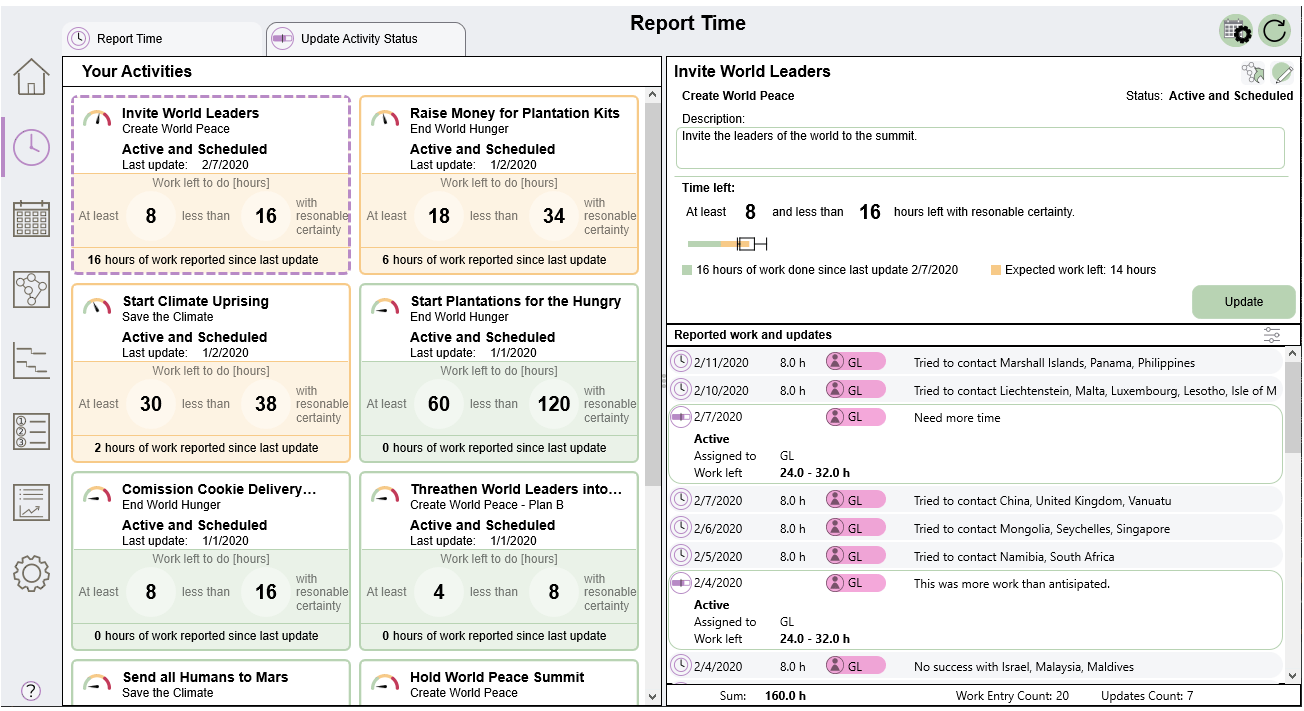
A small meter symbol on each card indicates the need for update. This value also decides the color of the card. Red indicates that the current estimate used can not be true, like not completed but zero time remaining. Yellow indicates that much work has been done since the last estimate, or that the relative uncertainty is large.
The bottom half of the card shows the estimated time left for the activity, as it currently stands. It is calculated by subtracting the reported and committed work done from the most recent estimate update. You can also see when the last update was made, and how much work has been reported since then.
When you click on a card to select it, information about the activity is displayed on the right side. The top frame shows details, and a graphical representation of reported and remaining work. Here is also a button to update the activity status or remaining time estimate.
Below is a list of all the time reports and previous updates, with their comments. They are displayed in chronological order, with the newest first. You can change how this list is displayed by clicking on the filter button, giving you the following alternatives.
- Work and Updates
- Work by date
- Work by person
- Work by comment
- Updates only
At the bottom there is a row showing statistics for the activity. You can select multiple time report rows by shift and ctrl clicking on them, and see the sum of the work they represent. These tools can help you figure out how the time was spent.
The update button opens the same update dialog as accessible from the edit activity dialog. You can change status and time left estimate. Leaving a comment will help you and others understand the status and progress of the work. It will help you get better at estimating time and risks in the future.

Sometimes it is valuable to create an update for an activity without changing the status or estimate, just to signal that it is up to date and not just ignored. If you make more than one update for an activity on the same day, the most recent update will replace the earlier one. The PlanMinder assumes that the remaining time in the estimate is remaining at the end of the day.

