The PlanMinder Manual - 11 Descriptions
This is one chapter from the manual. Access the full manual here.
Descriptions
All elements in a project plan has a description field. Good descriptions are important for team members to understand the scope and intention, especially for activities. Clarifying scope reduces risk of work being missed between two activities, and a good description helps with reporting time correctly.
The description overlay
Right clicking on an item in a tree view, a plan element in Kairos view, a list element in Chronos or Priority view, or on project elements on the Home page will open the Description Overlay.
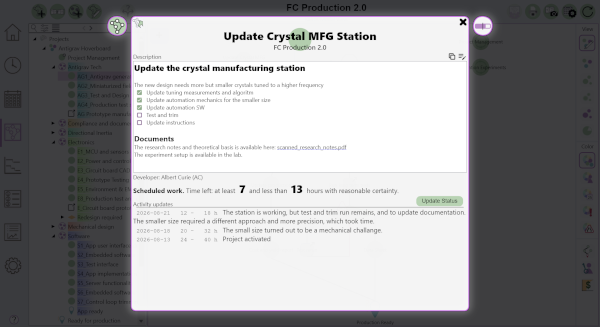
The description overlay will display the description text, and some other relevant information for the specific element type. If you are authorized to, you can also edit the description text directly in this overlay. Your changes will be saved when you exit the overlay.
You can exit the overlay by clicking on the X symbol in the corner, or by clicking anywhere in the shaded area outside the overlay window.
 The project symbol to the left of the main window will expand to a project information window when clicked. It will show information about the project and possibly groups the element is part of.
 The icon to the right of the main window will expand to a Progress Overview, giving you an overview of what has and is planned to happen in the project.
Editing descriptions with Markdown
Description text can be formatted using markdown syntax. Markdown is a way to add formatting information to plain text, without making the plain text harder to read. The PlanMinder uses a simple flat version of markdown, with some special extensions.
Description windows both in on the description overlay an in editing dialogues has two modes. In edit mode the text is shown as plain text and can be edited. In formatted mode the markdown formatting is applied. You can switch between the modes using the rightmost tool button.

You can also double click in the text window when in formatted view to start editing, and press CTRL + M when editing to go to formatted mode.
Markdown formatting
In edit mode the toolbar above will help you to insert formatting.
 # at the start of the line makes it a level 1 heading.
 ## at the start of the line makes it a level 2 heading.
 ### at the start of the line makes it a level 3 heading.
Shortcut key CTRL + H lets you circle through all levels of heading. Note that the space after # is mandatory.
 **bold** Two asterisks marks the start and end of bold text. Shortcut key CTRL + B.
 *italic* A single asterisk marks the start and end of italic text. Shortcut key CTRL + I.
There is no button for it, but three asterisks makes text ***bold and italic***.
 <link> Text between less than and greater then characters is treated as a link. Shortcut key CTRL + L.
 [name](link) The name between [] is shown as a link pointing to the hidden link between (). Shortcut key CTRL + N.
When a link is clicked the user will be asked if they do want to open it. Links must start with https:, http:, file: or mailto: to work.
 [ ], [X], [>], [p], [s] or [/] is shown as a ToDo list checkbox with different statuses. Shortcut key CTRL + T.
In format mode you can click on a ToDo checkbox to toggle between checked and uncecked without entering edit mode. CTRL + Click or CTRL + Shift + click cycles through all statuses. [>] is for active, [p] for paused and [/] for canceled.
 `code block` The tick character formats text as code with the Courier New fixed size font.
Both text formatted as code and text between "quotation marks" can be clicked and is then copied to the clipboard. Quotated text is shown with a grey background.
If you need to show characters that are part of formatting code, you can escape them by prepending them with backward slash, like \*.
 The Copy formatted text to clipboard button will copy all the text to the clipboard. You can paste it in any software that supports html formatted clipps, preserving the formatting. The level of formatting support differes between different applications.
Markdown limitations
If you are used to markdown formatting, note that these are all the formatting The PlanMinder supports. That the markdown is flat mean that it can not be nested. You can not make a heading italic, or a link bold. Grayed out buttons will indicate this. When the cursor is in an active format, the corresponding button will be red to indicate this.
ToDo items are not part of any markdown standard. The behavior of text between citation marks is also special to The PlanMinder. The PlanMinder will treat newline as the start of a new paragraph.
Another limitation is that a description can not be more than 4000 letters long.
Drag and drop
You can drag and drop files, links, text or e-mails from other applications onto a description text field you are authorized to edit. Exactly what happends depends on the source application and operating system, but normally information will be added last in the description.
- Files dropped on the description will create a link to that file. The file will not be added to The PlanMinder, so make sure that the path works for all who are intended to use the link.
- Dropped Links (https: and mailto:) will be added as clickable links.
- Text that is selected and dropped will be added as text last in the description.
- E-mails dropped will be added as text with some meta information. Note: This does not work with all e-mail software, and also depends on the format used in the e-mail.
In markdown display mode you can only drop on the empty space below the text. In edit mode you can drop anywhere. Files, text and links will be inserted as a new line below the cursor position. Dropped emails will be added at the end of the text.
Recommended use for descriptions
The first line of a description is used as a on mouse over hint in Kairos, and shown as information for the selected activity on the Report Time page. Use it as a one line summary.
If you are creating links to documents with file:, make sure the path is valid for all users.
ToDo-lists are useful both when creating and estimating an activity, as well as for personal tracking when working on it. Keeping other relevant notes in the description for an activity or other element during the project makes them easy to find for anyone involved, even long after the project has been completed.


