10 Steps to Create a Project Plan
This step by step guide describes how to create a project plan in The PlanMinder. This first numbered part focuses on what buttons to press. The example section describes more of the general methodology and how to think when creating a project using this framework.
Create a Project
You must be logged in as a manager or administrator user to create a new project.
 On the Kairos page, click the "New Project" button to bring up the creation dialog. Fill out the form, giving the project a name, a description and assign a project manager. Leave the project in the Idea state.
Close the dialog by clicking the create button.
Create activities
Once the project is created you will have an empty sheet where you can create activities. Right click on the work area where you want to create an activity, and click on the activity symbol (or press shortcut key "a").

Fill out the form and click create. Scheduled activities are left in status Active.
Unscheduled activities are set as Ongoing. Project management is a typical example of an ongoing activity that can not be scheduled. If estimated and included in the project it will be part of the project budget calculations, and it will be possible to report time for this activity.
Navigation
To move the "paper" you are creating your plan on, click and hold down left button to pan. You can also use the wasd keys to move in distinct steps.
The mouse wheel, or + and - buttons lets you zoom in and out.
The home and h button resets zoom and pan.
Add a prio point
 Right click and add a prio point to your project.
You can of course add other type of elements too, but you must add at least one milestone set as a prio point.
Create dependencies
Create dependencies to indicate if activities must be done in a certain order, and connect (direct or indirectly) all activities that are to be scheduled to a prio point.

Select the element you want to create a dependency from by clicking on it. Click on one of the connection points (or press t for top, or b for bottom). Complete the dependency connection by clicking on another element.
Double click to cancel a connection. To remove a dependency connection, click on the line to select it, and press delete.
You can move elements to make the plan more easy to read. Either by clicking and holding the mouse button down to drag them around, or by using the w a s d keys to move the selected element. Holding shift while dragging will lock the element to the same grid as when using the wasd keys.
Adding groups to your plan
You do not have to, but if your plan is big and have many activities, it may become easier to navigate if you group certain activities.
 To create a group, click on the Create Group button, fill out the form and click create. Groups do only exist in the tree view, but they do set the color of activities and other elements in the project plan.
You can move elements to and from groups by dragging them in the tree view, or by selecting the group in a edit or create dialog. New elements defaults to the selected group, or the group of the selected element.
You can choose to group things based on the type of work, or with groups for logical parts or steps of the project, or any other way that will help your team navigate the tree view and understand the project.
Check your plan.
It is easy to forget to enter a time estimate, and to change the default assigned developer.

Choosing View Uncertainty on the right side will change the size of the activity symbols in the plan so that size and fuzziness reflects estimated time and uncertainty. Selecting "Color by Developer" color codes activities by assigned developer. This will help you detect mistakes. (Remember to return to Edit mode when you want to continue to make changes to the plan.)

Drag the tree view divider to the right, or click on the show columns icon to select a column set to display information for all activities in text format, and if you wish, the time estimates as bar plots. You can change what to show in each column by clicking on the column header.
Use this to verify that all estimates and assignments have been set deliberately.
Check the project cost.
If you care, check the project cost before you start the project. You can get information in the tree view columns, either in hours or as a cost based on the hour cost set for each developer.
 You can also click the “Show cost probability distribution” button on the left to see the result of the Monte Carlo simulation for the whole project.
Center your project
The plus symbol on the planning area expands to a toolbar. The “Move project to paper center” button may be especially useful. It centralizes your project on the work area. You can also use shortcut key F3.
Activate.
 To start the project, bring up the project edit dialog by clicking on the project edit button, or double clicking on the project in the tree view. Set the project status to Active. Run the scheduler.
 Often it is a good idea to test to activate the project in a scenario first, to see how it pans out. To do this, first click on the scenario button (not available in the demo) and create a new scenario. Then set the project to active and perform step 8 and 9 while in the scenario until you are satisfied and are ready to commit to starting the project. Then go to the Scenario page and activate the scenario.
Assign Priority.
Give the project a priority. Go to the priority view and drag the prio points to their appropriate positions in the priority list. Newly activated projects will start at the bottom of the list.

Check the estimated done dates for the milestones to see if they are acceptable.
Check and Optimize Schedule.
Go to Chronos view and explore how the project is scheduled.

You may find bottlenecks or missed opportunities that could be solved by reassigning activities to different developers. You may find that you have missed a dependency, causing activities to be scheduled in an illogical order.
You are NOT done!
You have created a project plan, but your plan is not done. Even though your project has started, it does not mean you are done planning. You do not know everything when you start the project. You will learn more as work progresses, and the world will change while you are working. So should your plan.
One of the important points of The PlanMinder is that it is easy to change the plan. Update estimates when you know more. Add or remove activities as necessary, or split up big activities to facilitate more precise scheduling. Keep optimizing the schedule by reassigning work or changing priorities.
When all milestones have been reached and you can change project status to completed, then you are done planning.
Estimating time
You will get a better result if you involve the team in the planning and estimation. How and to what extent must be adapted to the situation.
It is possible to simultaneously co-work on a plan in The PlanMinder in a big meeting. Make frequent use of the reload-button (or CTRL+R), and coordinate to make sure you do not overwrite each others changes.
You could also create a base structure for the plan, and discuss details and estimations with relevant people one by one.
If your team is not available until the project starts, you can create the plan as best you can, and have team members go through their part of the project as they join.
How much effort you spend on the planning phase should depend on the stakes, how much risk you are willing to take and how much you need to know before you commit to starting the project.
Power user tricks
If you are going to create a big project with many activities, you may want to test some tricks to be more efficient.
The pie menu when right clicking to create a new element has the shortcut keys:
Activity
Ceckpoint
Milestone
Risk
External activity
Startpoint
When created the activity (or other element) will be selected. You can use the keyboard shortcuts Top, Bottom, Left or Right to immediately create dependencies.
If you are a fast typer you can use the dialog command syntax to fill out creation forms. Press CTRL+D to set focus to the description field of the form. Type commands as described below to enter information. Press CTRL+D again to execute the commands. If accepted they will be removed from the description. Then press CTRL+S to save and create.
:N name - fills out the name field.
:G groupname - selects a group that starts with text.
:@ initials - selects a person with the exact initials, or whose name starts with text.
:W worktype - selects a work type that starts with text.
:B billable - check the billable box, unless the argument starts with f or false.
:S status - status can be A, C, O or R/CR/CWR for activities, or N, O or F for discrete risks.
:T time estimate - fills out the time estimate. Example 20:40.
:R risk - fills out risk level for discrete risks, 0 to 100 integer.
:P priopoint - checks priopoint for a milestone, or f to clear.
:D date - fills out a date field. For milestones this also sets the Deadline flag.
:C checkpoint Approved checkbox - check or f to clear.
Example Project
In this section we will go through the creation of a project on a more conceptual level, with practical examples on how to think when working with The PlanMinder.
Lets imagine that we do have a specification for a new version of an existing product. It is an electronic controller unit, and we are going to extend the number of inputs and outputs on it. The project is to realize the specification and make this product ready for production.

This new version has been requested by a specific customer. We need to estimate the project cost, so that we can set a unit price. We must also find out when it can be delivered. If the cost and delivery date is not acceptable to the customer, we will not start the project.
To keep the example simple we will ignore any steps regarding production.
Dividing the project into activities
The first step when creating a plan is to divide the project into activities. Some tools and methodologies talks about tasks. The PlanMinder handles activities. An activity can be a single task, or a logically scoped collection of tasks to be done by one person in one go. In general you can think of an activity as bigger than a task.
To reduce the administrative burden, we do not want more activities than necessary. At a project management level, we do not care about the order in which tasks that make up an activity are performed. This is up to the developer assigned to the activity.
On the other hand, we do not want too big activities either. They will be hard to grasp when estimating, and will reduce our flexibility when optimizing the plan. Logically scoped is the key concept.
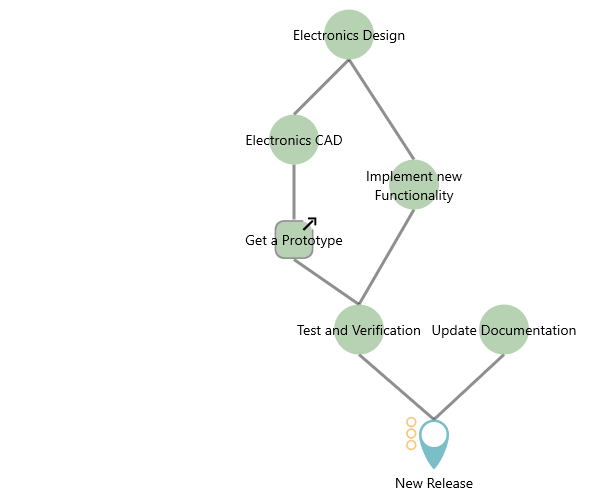
For our project we need to do some electronics design to add the outputs and inputs. We could consider this as many small tasks, (inputs, outputs, calculations, update bill of material, design review …), but Electronics Design seems like a logically scoped activity.
Electronics CAD is another activity, creating new printed circuit board manufacturing files. We could make design and CAD a single activity, but they are logically distinct, can be done by different people, and in different stages of the project.
We also need some mechanical design for the new casing, updated software and updated product documentation. We will need to get prototypes, test the new product and get it certified so that it can be sold. We also need an ongoing activity for project administration.
Before we get a go ahead from the customer, we need to calculate the unit cost. This mean that we need to spend some time to do enough of the electronics and mechanical design work to be reasonable sure about the costs. We should set up an activity for this before we start so that this time can be tracked and taken into consideration for the total project cost.
Creating the project in The PlanMinder
We create the project in The PlanMinder as in steps 1 to 4 from the previous chapter.
In addition to the activities, we need to plan for the time it takes to get prototypes. An external activity is added to model this. We also, as always, need to add a prio point.
As an electronic product, it needs to pass certification tests before it can be delivered to a customer. Electromagnetic compatibility (EMC) is part of these test, and notoriously difficult to predict the outcome of. There is a risk that the prototype will not past these test without some redesign. If a redesign and a new prototype is required, this means extra work and delays. We can model this as a discrete risk. As this is a change to an existing approved product, the risk is reasonable small, but can also encompass any other reason why the first prototype is not acceptable, like CAD or mechanical design mistakes.
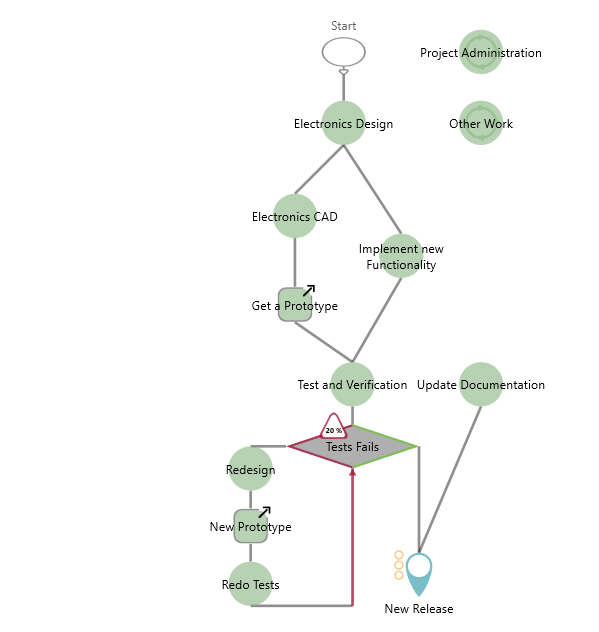
The project can not start until it has been approved by the customer. By adding a start point we can schedule the project based on the assumption that it will be approved before a certain date. Something we can set as a condition in our offer to the customer.
Unexpected things may happen. Adding a ongoing Other Work activity provides a place to report work that do not fit in any of the planned activities.
Estimating time
We need to estimate time for all of our activities. Both to know what the project will cost, and to estimate when it can be completed.
If possible it is always best to go through estimates with the people that will do the work. Either in a big meeting with the full intended team, or to be more efficient in smaller discussions for each activity. In this stage it is also important to check that no part of the project has been forgotten, or is falling between two activities.
The estimates are made with uncertainty. One number for the best case scenario, and one you are reasonable sure will be more than enough. Reasonable sure defined as seven times out of ten, you will use less time. When doing this it is good to look at similar things done in the past. Both to see how much time they did take, but also to see what kind of problems might occur, and how often they do.
Making good estimates takes time. How much time you are ready to spend on this is a balance act against the risks you are willing to take, and if you can spend the resources. If you end up not starting the project it will be wasted time. If you start a project with insufficient information, it may fail.
When you think the project plan is done, check that you have not forgotten anything as described in step 5.
Budget estimate
With all activities and risks estimated, we have the information needed for a budget estimate. The PlanMinder only handle planned work. You will need to keep track of other costs separately, like for prototypes and equipment.
The column and graphical view when expanding the tree view will give you a lot of statistical information on how much time the project as a total will take. If you are keeping track of different costs for different team members, you can let The PlanMinder calculate the total cost for the projected time and show it in columns.
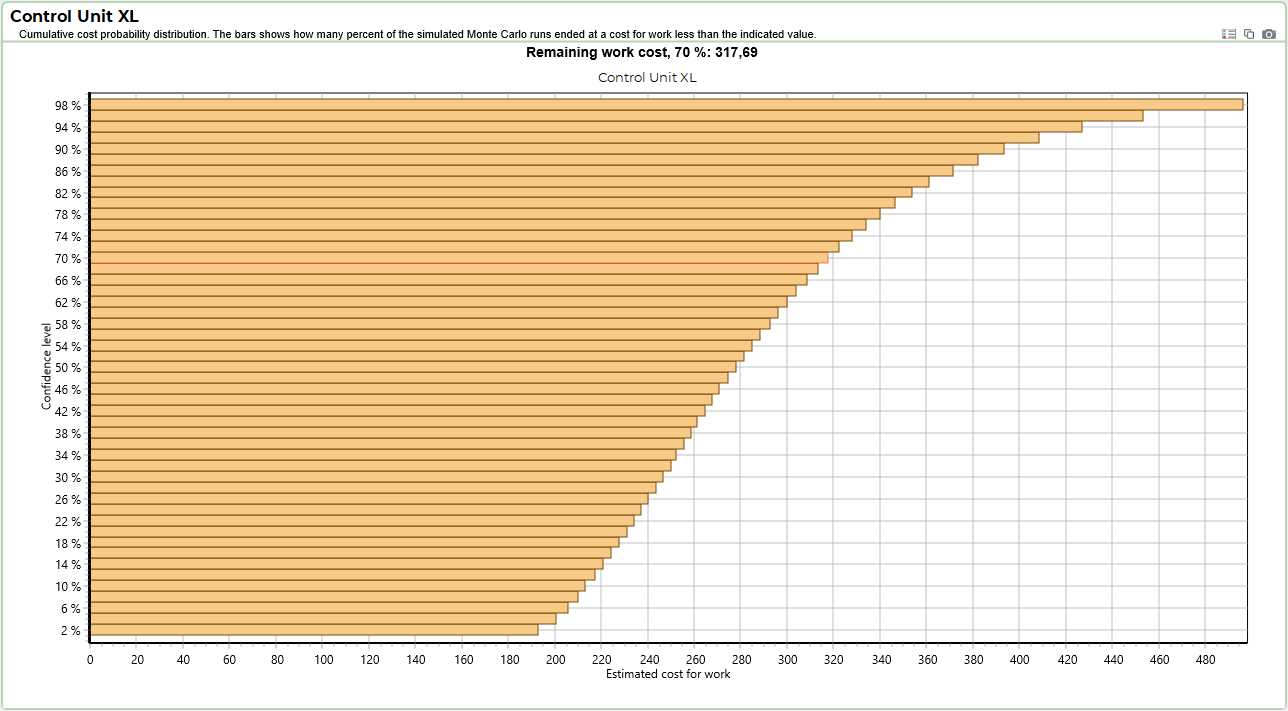
To get more detailed information about the uncertainty, click on the “Show cost probability distribution” button. This brings up a plot of estimated cost at different confidence levels. Yellow bars represent projected costs, and green bars the cost for already reported time. The bar at, for example, 70 % confidence level shows a cost that seven times out of ten will be higher than the actual end result.
Discrete risks can have a large impact on the plot, giving it distinct bumps. You can temporarily change the probability of discrete risks to 100 or 0 % to see how they contribute.
In our example we will need to set a fixed unit price for our customer, dividing the development cost on a number of units. Using the cost distribution we can do a risk / reward calculation and set a price that is likely to give us a good return on invested time, and that will not lead to disaster even if things are ending up in the worse end of the spectrum.
In other cases we may need to set a fixed cost for the development, or calculate if a project is worth doing at all. We may also find parts of the project where we need to know more, and proceed by making a deeper analysis to reduce uncertainty before deciding to continue or cancel.
Delivery date estimate
To estimate a delivery date we need to actually schedule the project. To do that we need to change the project status to Active, and give it a proper priority. However, as we do not know if we actually will end up starting the project, we can do this in a new scenario. This way we will not mess up the active planning everybody sees and are following.
Already in priority view we can see probabilities for end dates. We can see what happens if we raise the priority higher than existing projects. Both with our new project, and with the other projects.
Changing to the availability tab, we can see how our resources are utilized, and if there is room for optimizations.
We can also set the probability for the discrete risk to 100 % to see what happens if it fails, and if it still will be possible to meet a desired deadline.
In this case we may be free to choose what we promise our customer, but it may also be the case that the customer already has a deadline set. In the end it will be a business decision what risks are acceptable.
Running the project
If the project gets a green light and is started, we can set it to active and give it a priority. Or we can activate the scenario we scheduled it in. This is useful if we did change more things to optimize the plan. You can also create a first project report on the Reports page, to establish the baseline for estimated work and ready date.
As your team are working on the project, they will report the work they do in The PlanMinder. Running the scheduler updates the schedule based on the work actually done, and how much is remaining.
As you and your team start working, you will learn more about the tasks at hand. All team members are encouraged to update time estimates when they realize they can make a better one. Both for activities they are currently working on, and on upcoming activities if new information becomes apparent.
You might even discover that you have missed things in your original plan, or problems occur, so that you need to add new activities. We might for example realize that the new product does not fit in the existing delivery box, and add a Packaging Design activity to the project.
You can monitor the progress at a glance on the priority view. For deadlines the probability of reaching it on time is calculated, and you can see how the box and whiskers plot changes. Uncertainty should decrease as work progresses, and deadline success or failure should be more certain.
If the probability for reaching the deadline becomes uncomfortably low, you can start a scenario to investigate what you can do to improve the chances. You can test if reassigning work helps, if you can add more people, or if you can change the scope, or if you could give your project higher priority to access resources earlier. You can experiment to find out what solution is most efficient, and how long you can wait with implementing it.
With discrete risk in the project, it is interesting to create a scenario to see what happens if it fails. Create a new scenario and change the risk to 100 %. If needed you can change the planning in this scenario to still be able to meet the deadline. This becomes your plan B, that you can activate if necessary. All activities you have not changed in the scenario are updated as normal. This mean that you can come back to your plan B once in a while to check if it still is able to bring your project to success.
Even if your project is going well, you might want to look at the scheduling details to see if there are opportunities for optimization. Is anyone in risk of becoming idle, or are there opportunities to utilize available resources better. More detailed optimizations by reassigning activities are useful for the near future, the nearest couple of weeks. You do this on the Chronos page, where the Organize by PrioPoints view mode is especially useful.
The Kairos page Progress view mode will also give you a good overview of the state of the project.
The home page Latest Updates panel will show you the updates your team has recently done to activity status or estimates. To see more specifically what has happened on the project and specific activities the Reports / Follow up tab will give you that information.
The End
When the final milestone has been reached and the project is complete, you can set the project status to “Done”. This will remove it from the prio list, and no activities will be scheduled. It does not prevent more time from being reported on activities. There may be some stray work that still needs to be done, at least on the Project Management activity.
When any remaining work definitely belongs to some product management activity in some other ongoing project, or however you have decided to handle such tasks, you can change the project status to “Closed”. This will remove it from the project tree on the Report Time page, and by default hide it on most other pages. Before you do you should create a final project report on the Reports page, and sumarize the important things that have happened thath you may learn from in the future.
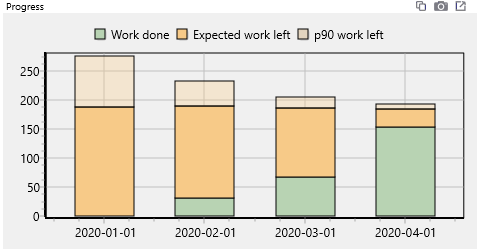
Image: Progress report element from a project report.
In this example we forgot about delivery packaging, so maybe we add that activity to a template project so it will not be missed in the future.
